

How to Take a Screenshot on Windows 10 in 2022
Windows 10 is a great operating arrangement for beginners and professionals alike. For quite some time, Microsoft has been improving the overall experience on Windows 10 with new features and useful apps. I of the all-time improvements Microsoft brought with Windows 10 was the revamped screenshot tool. Users were asking for an avant-garde screenshot and annotation tool for a long time and Microsoft did deliver it. In this article, I will accept you through all the new and old ways to take a screenshot on Windows 10. Forth with that, I volition share some crawly third-political party apps which can save you a lot of hassle while taking a screenshot. And then having said that, let's begin with the native tools offset.
Taking Screenshot on Windows 10 in 2020
There are various ways to take screenshot on Windows 10. In this article, nosotros are first going to see how we tin take screenshots using native tools and then move on to some third-political party tools that provide extra features.
Take a Screenshot on Windows ten with Native Tools
In this section, we are going to show you all the ways you tin can take a screenshot on Windows 10 with the native tools. Besides that, we volition besides share some apps which let y'all comment and do advanced markup on the screenshots. And so without further delay, allow's begin with the simplest way to take a screenshot on Windows 10.
1. Take a Screenshot with a Keyboard Shortcut
The most effortless style to take a screenshot on Windows 10 is through a keyboard shortcut. Just press Windows and "impress screen" keys at once and a screenshot will be taken instantly. The paradigm will exist saved in your User folder. If y'all are unable to locate it, navigate to the below location to find the image on your Windows x PC. Also, the impress screen key has different naming schemes then you might encounter "prt sc", "prt scr", "prt scrn" and other variations on your keyboard. All these keys are the same and have a similar function.
C:\Users\[your user name]\Pictures\Screenshots

2. Have a Screenshot Without Saving the File
This method is very similar to the kickoff one and a very piece of cake i at that. If you want to have a screenshot, merely don't desire to relieve the image file and then follow this process. Just press the "print screen" primal in one case and Windows volition take a screenshot in the background. Yous won't see any difference in the UI while taking the screenshot but the screenshot will be taken and copied to your clipboard. Just paste it wherever yous want and the screenshot volition be right there. Press "Ctrl" and "V" keys to paste the screenshot seamlessly.
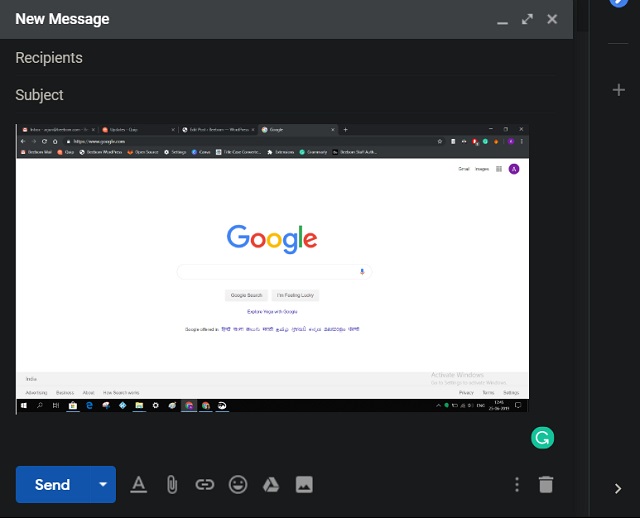
If you are wondering what are the use cases of taking a screenshot without saving the file and so here are a few examples. Say, you want to share a screenshot through an email. In that case, just press the print screen key and so paste it in the Compose window. Voila, there you have your screenshot. No demand to find the image and so attach it manually. Similarly, if you want to edit the screenshot in MS Paint or whatsoever epitome editor, just paste it in the Paint window and yous take the paradigm correct there, set to be edited.
Note: This method works in all version of Windows. Nevertheless in the latest version of Windows (Windows 10 1809 and later), the print screen key can be reassigned to work every bit a shortcut for opening screen snipping feature. More on this in point 4.
three. Take a Selectable Screenshot
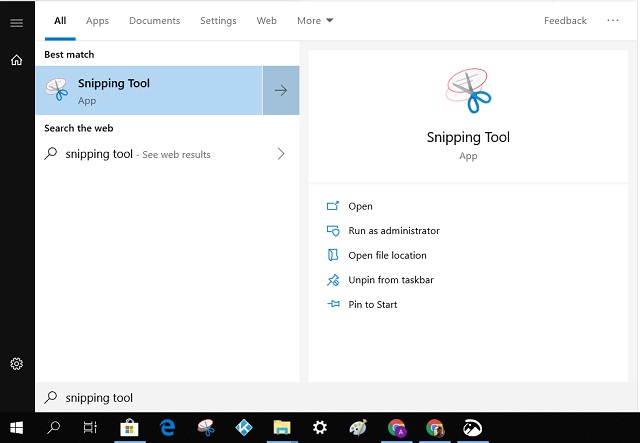
If you want to select a screenshot on your screen and so Snipping Tool is the best mode to exercise information technology. Snipping Tool is an inbuilt avant-garde screenshot and markup tool bachelor on most all Windows 10 PC. It provides you a lot of flexibility in choosing your content window, image annotation, access to snipping modes, etc. Then here is how to utilize information technology. But press the Windows key once and type "Snipping Tool". It volition bear witness up in the search results.
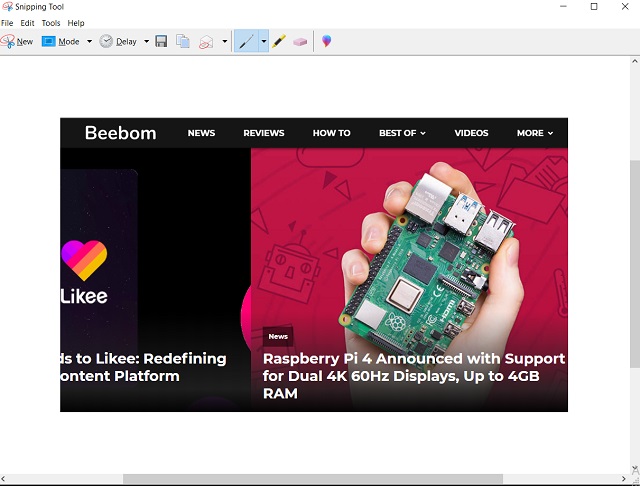
Open it and click on the "New" button to cull your screenshot window. Subsequently that, you lot can save it as a file, highlight and annotate it or simply send the screenshot through email.
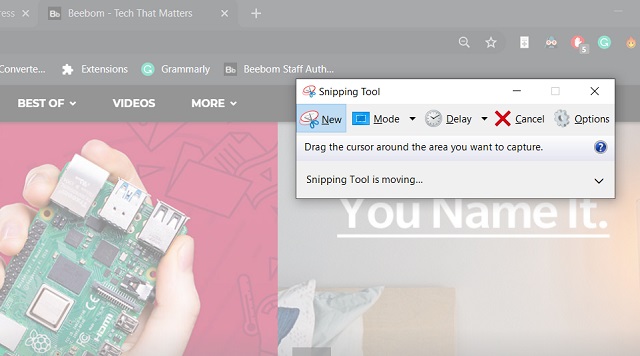
It likewise has four different modes to have a screenshot. You lot tin take a screenshot in a rectangular manner which is the most common manner to do it. You can besides use the "gratis-course" fashion to take a screenshot in any shape you lot desire. The "window-snip" fashion will permit you take a screenshot of the current window that y'all are agile in and "full-screen snip" basically takes a screenshot of the consummate screen. At that place is a timer also in instance you want to filibuster screen capture by a few seconds. Yous can also bank check out snipping tool alternatives if you don't similar to use the native one.
iv. Employ the Screen Snipping Feature
With the latest Windows update, Microsoft is moving the pop Snipping Tool to a new, modern screenshot tool called Snip and Sketch. It brings all the functionalities of the Snipping Tool with modernistic aesthetics and a great shortcut to take screenshots quickly. Just press Windows + Shift + Due south keys at in one case and yous will exist able to have a screenshot correct on your screen. It'southward a much ameliorate way to practice information technology, but similar the macOS.
![Take a Selectable Screenshot [Modern UI]](https://beebom.com/wp-content/uploads/2019/06/Take-a-Selectable-Screenshot-Modern-UI.jpg)
In improver, y'all get all the features like free-class snipping, annotation and all. Afterward taking the screenshot, you can annotate, save or share the paradigm direct on social media platforms.
![Take a Selectable Screenshot [Modern UI] 2](https://beebom.com/wp-content/uploads/2019/06/Take-a-Selectable-Screenshot-Modern-UI-2.jpg)
Note that in Windows x version 1809 and afterward you can remap the print screen cardinal to perform the same office. To do that, open Settings and then become to Ease of Admission -> Keyboards -> and turn on the toggle below Print Screen Shortcut. One time y'all do this you lot can just hitting the print screen fundamental to invoke the screen snipping. All the same, once you enable this, the feature mention in point 2 on this list will stop working.

5. Take a Screenshot with Xbox Game Bar
Windows 10 ships with Xbox Game Bar which has the power to take a screenshot seamlessly in a graphics-intense playback. It's pretty fast and works absolutely cracking due to the DVR back up. If you are playing a game or a high-action moving-picture show and want to take a screenshot completely freezing the moment, this is the best manner to do it. All yous have to do is press Windows + Alt + Impress Screen keys at once and the screenshot will be taken and saved at this location.
C:\Users\[your user name]\Videos\Captures
Take a Screenshot on Windows 10 with Third-party Apps
In the to a higher place section, we have shared the five best ways to accept a screenshot without using any third-party apps. However, if you find those options limiting and want more advanced tools for taking screenshots then here are a few bully third-party apps.
i. ShareX
ShareX is an amazing tool to take a screenshot on Windows ten. It's a free and open-source app bachelor on Microsoft Store. ShareX is an advanced screenshot tool which lets yous capture the agile window, selectable screenshot, dual monitor, etc. Further, it can upload the image rapidly on the cloud and can provide you a shareable link. The all-time part is that you lot tin can take a long screenshot using the Scrolling Capture feature. Other than that, you can personalize the shortcut keys to have a screenshot. These personalized hotkeys tin can significantly ameliorate your workflow. ShareX also supports screen recording and text capturing(OCR) from images. Both these features are absolutely great and useful. All in all, if yous are looking for a feature-packed screenshot tool on Windows 10, ShareX is the best app to get.

Install ShareX (Free)
2. Greenshot
Greenshot is an awesome new app to take screenshots on Windows x. The process to take a screenshot is kind of ingenious. Just press the Print Screen central once and you lot can frame your screenshot on the screen. The moment you are done framing the screenshot, information technology instantly provides you various options. Yous can save the file on Desktop, upload the image directly to Imgur, open it in MS Paint, etc. Yous can also press Alt + Impress Screen cardinal at once to take a full-screen screenshot. Overall, Greenshot is a pretty lightweight app which runs in the background so it volition never be tasking on your PC. I plant Greenshot to exist really fast and simple to use. If you want a simple screenshot tool with instant sharing options then Greenshot is a bully alternative.

Install Greenshot (Free)
Meet Likewise: How to Speed up Windows 10 in 2019 [Effective Methods]
Take Screenshot on Windows ten Like a Pro
So that was our detailed article on how to accept a screenshot on Windows 10 efficiently. You lot can choose whatever of the methods based on what you lot find piece of cake to remember and use. Having said that, my personal favorite remains Windows + Shift + Southward shortcut. It is pretty easy to recollect, the notation through Snitch and Sketch is peachy and information technology provides an overall seamless experience. So that'due south all from us. If we missed something or you lot have a new trick upwardly your sleeves, and then let the states know in the annotate department below. Nosotros volition be happy to await at it.

Source: https://beebom.com/screenshot-on-windows-10/
Posted by: whitesitch1991.blogspot.com
0 Response to "How to Take a Screenshot on Windows 10 in 2022"
Post a Comment